Tip based industries
This guide focuses on the quickest and easiest way to get started with the features of Moov we think you'll find most useful in an industry that involves giving customers the option to tip. Onboard customers to a secure payment platform and send payment links with various tipping options.
Moov offers a variety of integration options to get started. Use Drops or the Dashboard UIs for a low to no-code solution, or choose the API or one of many SDKs for more complex integrations.
For the purposes of this guide, we'll provide Dashboard and API examples.
Onboard customers
As you move through the onboarding process to create Moov accounts, some data is required while other data is optional. To view our full onboarding guides, visit the Dashboard or main onboarding guides.
| Onboarding data | Required |
|---|---|
| Capabilities | ✓ |
| Fee plan | ✓ |
| Scopes | ✓ |
| Return URL | × |
| Terms of service URL | × |
| Prefilled data | × |
Capabilities determine what each Moov account can do, such as receiving transfers, or sending money to others. For risk and fraud protection purposes, we require detailed information when requesting capabilities. For example, we'll request more details if an account wants to collect funds than we would for an account receiving funds.
- Transfers: Authorize debit transfers
- Wallet: Store funds with Moov
- Send funds: Send funds to another account
- Collect funds (Business accounts only): Collect funds from another account
Pricing & fee plans can be assigned to one account or reused for many accounts. New accounts must agree to and accept the fee plan before it can go into effect. Moov offers two types of plans:
- Cost plus: With a cost plus plan, card networks’ interchange fees and Moov’s processing markup are passed along to the account. Cost plus plans are beneficial for accounts with a high and varied transaction volume that prefer to have more control over fees. Fees are broken down into a more digestible and transparent format.
- Flat rate: With a flat rate plan, you can lump all the processing fees together with a flat rate customized for each account. Flat plans are beneficial for accounts with a low transaction volume that prefer a predictable solution over lowering cost as much as possible.
Scopes are used to determine what can be done with the account once it's onboarded. For example, the /accounts.read scope provides access to view all connected user accounts and the /accounts/{accountID}/files.read scope provides access to view or upload files associated with a Moov account.
Read more on required data in our documentation:
Moov will send the terms of service platform agreement as part of the onboarding process through the Dashboard. Everyone with a Moov account must agree to and accept the terms of service before using Moov.
The following clip demonstrates how to create a new onboarding link in the Dashboard:
You'll need to generate and send a terms of service platform agreement as part of the onboarding process. Everyone with a Moov account must agree to and accept the terms of service before using Moov. If you're using the API, an SDK, or Moov Drops to onboard, see the terms of service platform agreement guide for more information and instructions.
The following is a sample request to create an onboarding invite with all available data:
curl -X POST "https://api.moov.io/onboarding-invites" \
  -H "Authorization: Bearer {token}" \
  -H "x-moov-version: v2024.01.00" \
  --data-raw '{
    "returnURL": "https://mycompany.com/account",
    "termsOfServiceURL": "https://mycompany.com/terms-of-service",
    "scopes": [
      "accounts.read",
      "bank-accounts.read",
      "bank-accounts.write",
      "capabilities.read",
      "capabilities.write",
      "profile.read",
      "profile.write",
      "payment-methods.read",
      "transfers.read",
      "transfers.write",
      "wallets.read"
    ],
    "grantScopes": [
      "accounts.read",
      "bank-accounts.read",
      "bank-accounts.write",
      "capabilities.read",
      "capabilities.write",
      "profile.read",
      "profile.write",
      "payment-methods.read",
      "transfers.read",
      "transfers.write",
      "wallets.read"
    ],
    "capabilities": [
      "transfers",
      "wallet.balance"
    ],
    "feePlanCodes": [
      "b6134307-8922-4a72-bf3c-d0297bbe8a35"
    ],
    "prefill": {
      "mode": "production",
      "accountType": "business",
      "profile": {
        "business": {
          "legalBusinessName": "LBM Lenders LLC",
          "doingBusinessAs": "LBM Lenders",
          "businessType": "llc",
          "address": {
            "addressLine1": "123 Main Street",
            "addressLine2": "Apt 302",
            "city": "Boulder",
            "stateOrProvince": "CO",
            "postalCode": "80301",
            "country": "US"
          },
          "phone": {
            "number": "8185551212",
            "countryCode": "1"
          },
          "email": "amanda@classbooker.dev",
          "website": "www.lbmlenders.com",
          "description": "Financial institution for personal lending",
          "taxID": {
            "ein": {
              "number": "123-45-6789"
            }
          },
          "industryCodes": {
            "naics": "522291",
            "sic": "6141",
            "mcc": "6141"
          },
          "primaryRegulator": "FDIC"
        }
      },
      "metadata": {
        "property1": "string",
        "property2": "string"
      },
      "termsOfService": {
        "token": "kgT1uxoMAk7QKuyJcmQE8nqW_HjpyuXBabiXPi6T83fUKRJkA3dsFID6fzitMpm2qrOh4"
      },
      "foreignID": "4528aba-b9a1-11eb-8529-0242ac13003",
      "customerSupport": {
        "phone": {
          "number": "8185551212",
          "countryCode": "1"
        },
        "email": "amanda@classbooker.dev",
        "address": {
          "addressLine1": "123 Main Street",
          "addressLine2": "Apt 302",
          "city": "Boulder",
          "stateOrProvince": "CO",
          "postalCode": "80301",
          "country": "US"
        },
        "website": "www.lbmlenders.com"
      },
      "settings": {
        "cardPayment": {
          "statementDescriptor": "LBM Lenders"
        },
        "achPayment": {
          "companyName": "LBM Lenders"
        }
      }
    }
  }'\
Read more about accounts and onboarding in our documentation:
Create tipping presets
Tipping can be enabled with different options per Moov account. Each Moov account's settings can be set with different tipping presets (a percentage or set amount) or a free form field. Percentages can be set to be calculated on a pre or post-tax basis.
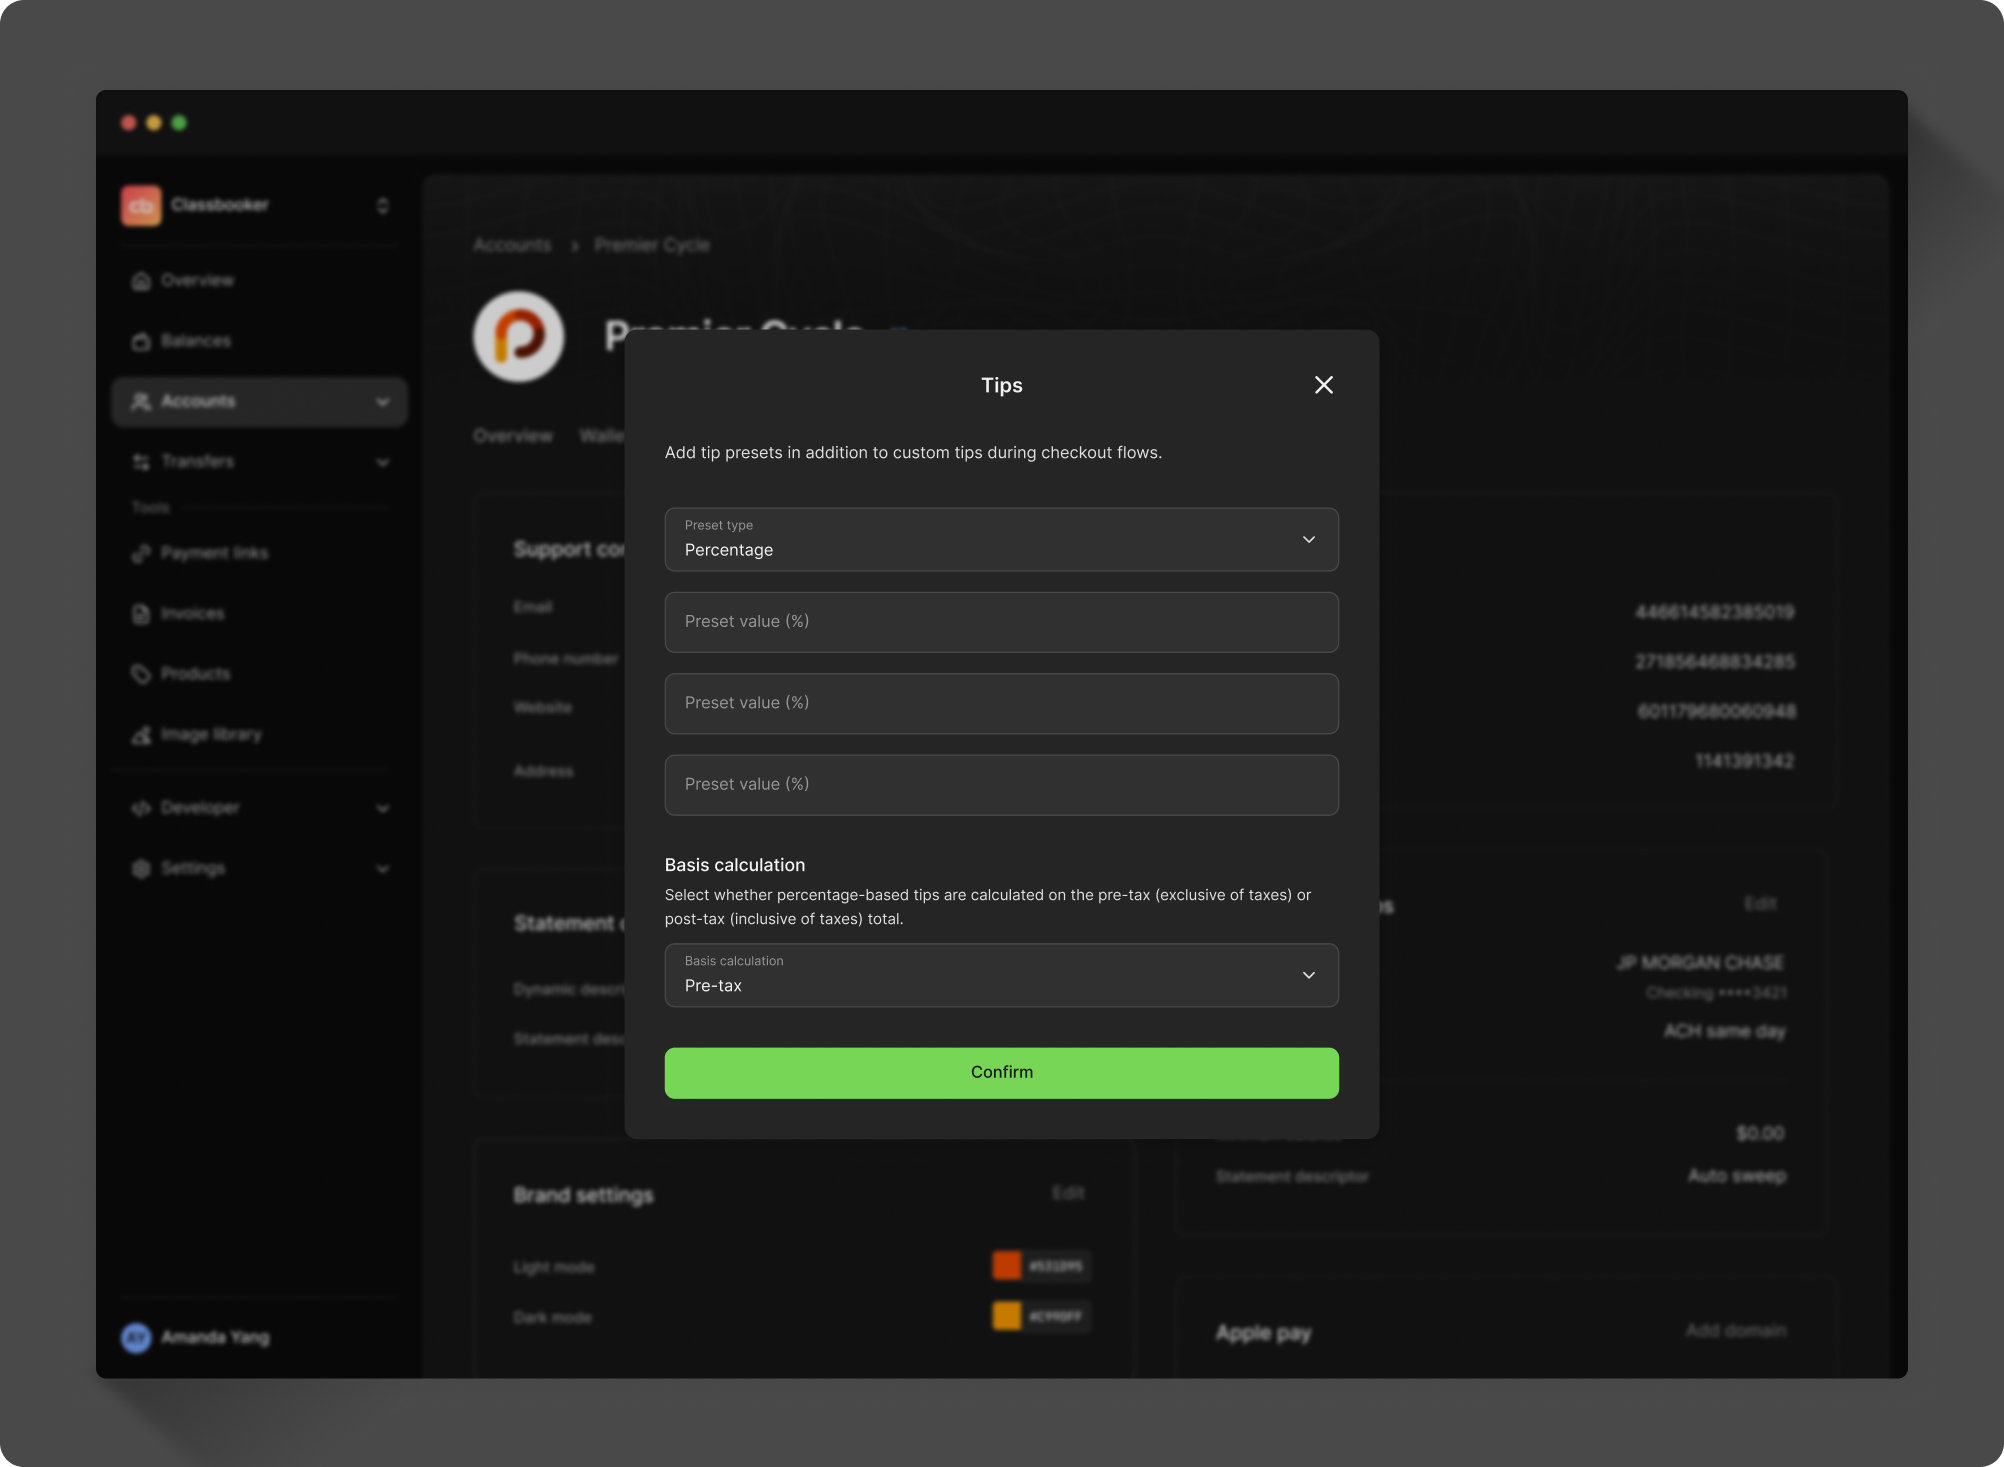
You can create presets for Moov accounts via the Dashboard or API.
In the Dashboard, set presets for each Moov account, choosing three percentages or set amounts.
Use the /transfer-config endpoint to set presets for each Moov account, choosing three percentages or set amounts.
curl -X POST "https://api.moov.io/accounts/{accountID}/transfer-config" \
  -H "Authorization: Bearer {token}" \
  -H "X-Moov-Version: v2026.04.00" \
  -d '{
    "tipPresets": {
      "calculationBasis": "pre-tax",
      "percentageOptions": [
        5,
        15,
        25
      ]
    }
}'
If you enable tipping on an account, but do not choose any presets, the tip field will be a free-form option. Tipping is always optional for the customer.
Read more about account settings in our documentation:
Create a payment link
After creating presets per Moov account, you can enable tipping per payment request. Toggle tipping on when creating a payment link, or set tippingEnabled to true via the API when creating a payment link. Turning on tipping will show the customer the presets, or present them with a free-form field, depending on settings.
 1curl -X POST "https://api.moov.io/accounts/{accountID}/payment-links" \
 2  -H "Authorization: Bearer {token}" \
 3  -H "X-Moov-Version: v2026.04.00" \
 4  -d '{
 5  "partnerAccountID": "d290f1ee-6c54-4b01-90e6-d701748f0851",
 6  "merchantPaymentMethodID": "4c4e7f8e-81f4-4f3d-8f6f-6f6e7f8e4c4e",
 7  "amount": {
 8    "currency": "USD",
 9    "value": 1200
10  },
11  "customer": {
12    "requirePhone": true,
13    "tippingEnabled": true
14  },
15  "display": {
16    "title": "Order no. 6",
17    "description": "Lunch combo",
18    "callToAction": "pay"
19  },
20  "payment": {
21    "allowedMethods": [
22      "card-payment",
23      "ach-debit-collect"
24    ]
25  }
26}'
If you're not utilizing payment links, you can also set a tip amount when creating a transfer via the transfers API. Tips can be set in amountDetails.tip.
Read more about payment links and tipping in our documentation:
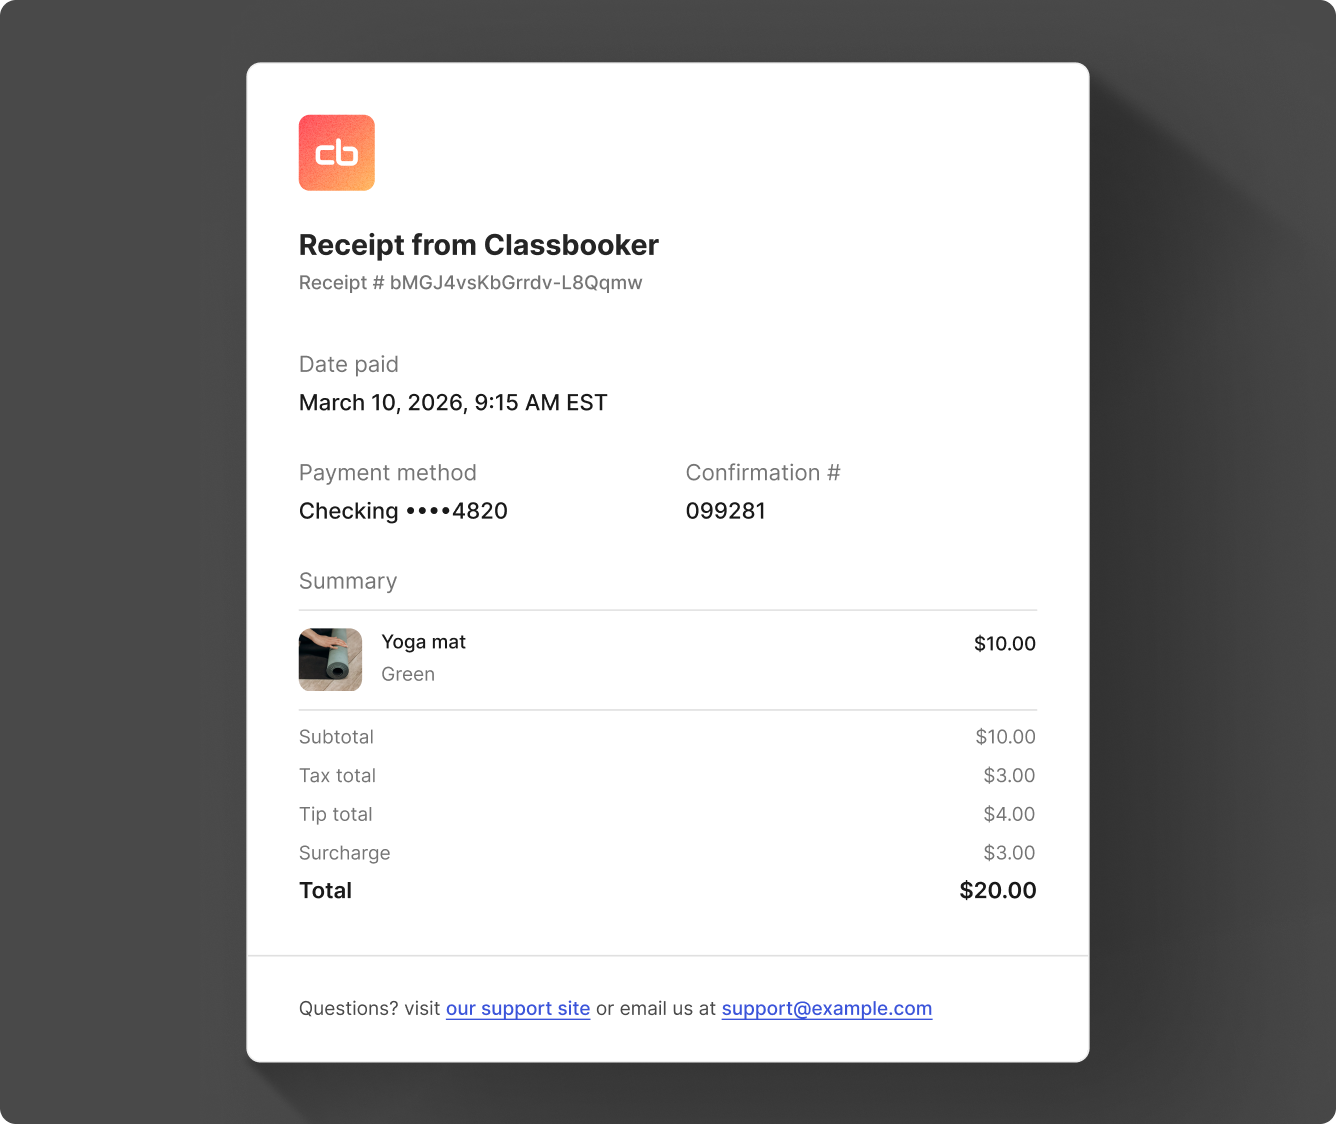
Branded receipts
With a payment link, a branded receipt is sent. Receipts can include the following details:
- Transfer amount
- Transfer date
- Receipt ID
- Transfer description (if provided)
- Source payment method
- Sales tax amount and total amount paid (if applicable)
- Tip amount (if applicable)
- Surcharge amount (if applicable)
- Issuer confirmation number (if applicable)
Branded receipts can also be sent with general transfers. Read more on receipts in our documentation: